NodeJS is a very popular platform for building backend services and creating API endpoints. Several large companies use NodeJS in their microservices tech stack, which makes it a very useful platform to learn and know, similar to other popular languages like Java and Python. ExpressJS is a leading framework used for building APIs, and TypeScript provides necessary strict typing support, which is very valuable in large enterprise application development. TypeScript and ExpressJS combined together allow the development of robust distributed backend systems. Securing access to such a system is very critical.
The NodeJS platform offers several options for securing APIs, such as JWT (JSON Web Token), OAuth2, Session-based authentication, and more. JWT has seen a rise in adoption due to several key characteristics when it comes to securing the APIs. Some of the noteworthy benefits of using JWT to secure APIs are noted below:
- Stateless authentication: JWT tokens carry all necessary information for authentication with them and don’t need any server-side storage.
- Compact and efficient: JWT tokens are small, allowing for easy transmission over the network. They can be easily sent in HTTP headers.
- CORS-support: As JWT tokens are stateless, they make it super easy to implement cross-browser support. This makes them ideal for Single Page Applications (SPAs) and microservices architectures.
- Standardized format: JWT tokens follow RFC 7519 – JWT specification, which makes them ideal for cross-platform interoperability.
In this tutorial, you will be building NodeJS-based microservices from scratch using Express and TypeScript in the beginning. The tutorial implements a library book management system where a user can view as well as edit a catalog of books. Later, you will be securing the endpoints of this microservice using JWT. The full code for the tutorial is available on this GitHub link. However, I encourage you to follow along for deeper insights and understanding.
Prerequisites
To follow along in the tutorial, ensure the below prerequisites are met.
- Understanding of JavaScript. TypeScript familiarity is a great bonus to have.
- Understanding of REST API operations, such as
GET,POST,PUT, andDELETE. - NodeJS and NPM installed on the machine. This can be verified using
node -vandnpm -v. - An editor of choice. Visual Studio Code was used in the development of this tutorial and is a good choice.
Initiating the New NodeJS App
Create a new folder on your local machine and initiate a new NodeJS application using the commands below:
mkdir ts-node-jwt
cd ts-node-jwt
npm init -y
The NodeJS you will build uses TypeScript and ExpressJS. Install necessary dependencies using the npm commands below:
npm install typescript ts-node-dev @types/node --save-dev
npm install express dotenv
npm install @types/express --save-dev
The next step is to initiate and define TypeScript configuration. Use the command below to create a new TypeScript configuration:
At this point, open the project folder in your editor and locate the freshly created tsconfig.json file and update its content as per below:
{
  "compilerOptions": {
    "target": "ES6",
    "module": "commonjs",
    "strict": true,
    "esModuleInterop": true,
    "forceConsistentCasingInFileNames": true,
    "skipLibCheck": true,
    "outDir": "./dist"
  },
  "include": ["src"],
  "exclude": ["node_modules"]
}
Creating the Basic App With No Authentication
Create a folder named src inside the project root, and inside this src directory, create a file name server.ts. This file will contain basic server boot-up code.
/*Path of the file: project-root/src/server.ts*/

import express from 'express';
import dotenv from 'dotenv';
import router from './routes';

dotenv.config();

const app = express();
const PORT = process.env.PORT || 3000;

app.use(express.json());
app.use('/api', router);

app.listen(PORT, () => {
  console.log(`Server is running on http://localhost:${PORT}`);
});
Create a directory named routes under src and add file index.ts to it. This file will hold routing details and handling of routes for APIs needed to implement the catalog system that you are building.
/*Path of the file: project-root/src/routes/index.ts*/

import { Router } from 'express';
import {
    getAllBooks,
    getBookById,
    addNewBook,
    removeBook
} from '../controllers/bookController';

const router = Router();

router.get('/books', getAllBooks);
router.get('/books/:id', getBookById);
router.post('/books', addNewBook);
router.delete('/books/:id', removeBook);

export default router;
Next, you should create a book controller. This controller will hold code for handling, receiving, and responding to actual API calls. Create controllers directory under src.
Add a file named bookController.ts under src/controllers directory. Add the code below to this file. This controller code receives each individual API call, parses its request when needed, then interacts with the service layer (which you will build in the next steps), and responds to the user.
/*Path of the file: project-root/src/controllers/userController.ts*/

import { Request, Response } from 'express';
import { getBooks, findBookById, addBook, deleteBook } from '../services/bookService';

export const getAllBooks = (req: Request, res: Response): void => {
  const books = getBooks();
  res.json(books);
};

export const getBookById = (req: Request, res: Response): void => {
  const bookId = parseInt(req.params.id);

  if (isNaN(bookId)) {
    res.status(400).json({ message: 'Invalid book ID' });
    return;
  }

  const book = findBookById(bookId);
  if (!book) {
    res.status(404).json({ message: 'Book not found' });
    return;
  }

  res.json(book);
};

export const addNewBook = (req: Request, res: Response): void => {
  const { title, author, publishedYear } = req.body;

  if (!title || !author || !publishedYear) {
    res.status(400).json({ message: 'Missing required fields' });
    return;
  }

  const newBook = {
    id: Date.now(),
    title,
    author,
    publishedYear
  };

  addBook(newBook);
  res.status(201).json(newBook);
};

export const removeBook = (req: Request, res: Response): void => {
  const bookId = parseInt(req.params.id);

  if (isNaN(bookId)) {
    res.status(400).json({ message: 'Invalid book ID' });
    return;
  }

  const book = findBookById(bookId);
  if (!book) {
    res.status(404).json({ message: 'Book not found' });
    return;
  }

  deleteBook(bookId);
  res.status(200).json({ message: 'Book deleted successfully' });
};
The controller interacts with the book service to perform reads and writes on the book database. Create a JSON file as per below with dummy books, which will act as the database.
 /*Path of the file: project-root/src/data/books.json*/

[
    {
        "id": 1,
        "title": "To Kill a Mockingbird",
        "author": "Harper Lee",
        "publishedYear": 1960
    },
    {
        "id": 2,
        "title": "1984",
        "author": "George Orwell",
        "publishedYear": 1949
    },
    {
        "id": 3,
        "title": "Pride and Prejudice",
        "author": "Jane Austen",
        "publishedYear": 1813
    }
]
Read this book’s details in the service file and provide methods for updating the books as well. This code implements an in-memory book database. Add a directory services under src and add file bookService.ts with the code below.
/*Path of the file: project-root/src/services/bookService.ts*/

import fs from 'fs';
import path from 'path';

interface Book {
  id: number;
  title: string;
  author: string;
  publishedYear: number;
}

let books: Book[] = [];

export const initializeBooks = (): void => {
  const filePath = path.join(__dirname, '../data/books.json');
  const data = fs.readFileSync(filePath, 'utf-8');
  books = JSON.parse(data);
};

export const getBooks = (): Book[] => {
  return books;
};

export const findBookById = (id: number): Book | undefined => {
  return books.find((b) => b.id === id);
};

export const addBook = (newBook: Book): void => {
  books.push(newBook);
};

export const deleteBook = (id: number): void => {
  books = books.filter((b) => b.id !== id);
};

export const saveBooks = (): void => {
  const filePath = path.join(__dirname, '../data/books.json');
  fs.writeFileSync(filePath, JSON.stringify(books, null, 2));
};
The initial version of the application is almost ready. Update server.ts code to initiate the database and then add a server startup script in the package.json file.
/*Path of the file: project-root/src/server.ts*/

import express from 'express';
import dotenv from 'dotenv';
import router from './routes';
import { initializeBooks } from './services/bookService';

dotenv.config();

initializeBooks();

const app = express();
const PORT = process.env.PORT || 3000;

app.use(express.json());
app.use('/api', router);

app.listen(PORT, () => {
  console.log(`Server is running on http://localhost:${PORT}`);
});
/*Path of the file: project-root/package.json*/
...rest of file

  "scripts": {
    "test": "echo \"Error: no test specified\" && exit 1",
    "start": "ts-node-dev src/server.ts"
  },
...rest of file
Finally, start the application by using command npm start. You should see output like below on the screen, and the server should start.

Testing the APIs Without Authentication
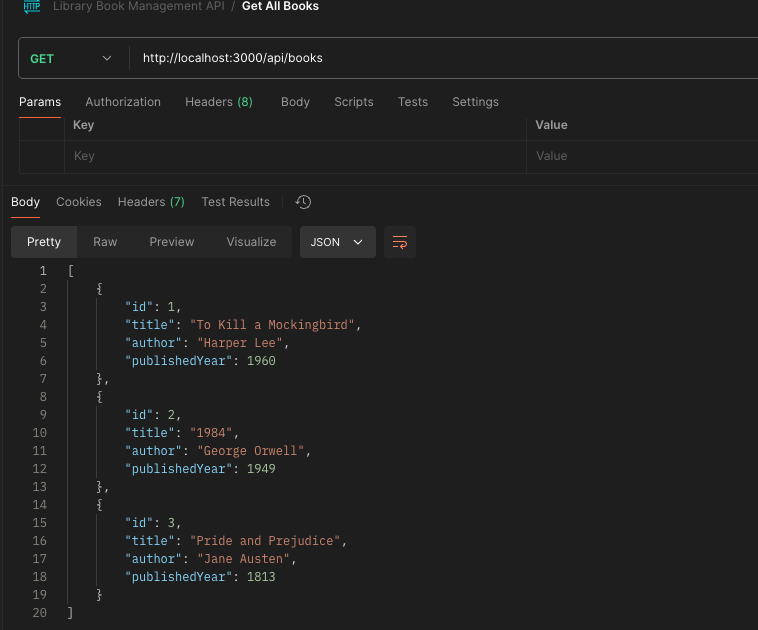
Now that the server is up, you should be able to test the API. Use a tool such as Postman and access the URL http://localhost:3000/api/books to get responses from APIs. You should see a response like the one below:

Similarly, you can use API endpoints to update or delete books as well. I have created a postman collection which you should be able to import use inside the postman. You can get at this link.
The API for creating new books is http://localhost:3000/api/books, and the API to delete the books is http://localhost:3000/api/books/:id.
Implementing JWT Authentication
At this point, you are ready to secure the APIs. You will need a list of users who can access the book management APIs. Create a dummy users.json file under the data directory to hold our in-memory users.
 /*Path of the file: project-root/src/data/users.json*/
[
  {
    "id": 1,
    "username": "john_doe",
    "email": "john@example.com",
    "password": "password1"
  },
  {
    "id": 2,
    "username": "jane_doe",
    "email": "jane@example.com",
    "password": "password2"
  }
]
Now it is time to create two file userService.ts and userController.ts which will hold login to provide a route to authenticate a user based on username and password.
 /*Path of the file: project-root/src/services/userService.ts*/
import fs from 'fs';
import path from 'path';

interface User {
  id: number;
  username: string;
  email: string;
  password: string;
}

let users: User[] = [];

export const initializeUsers = (): void => {
  const filePath = path.join(__dirname, '../data/users.json');
  const data = fs.readFileSync(filePath, 'utf-8');
  users = JSON.parse(data);
};

export const findUserByUsername = (username: string): User | undefined => {
  return users.find((user) => user.username === username);
};

export const generateToken = (user: User): string => {
  const payload = { id: user.id, username: user.username };
  return jwt.sign(payload, process.env.JWT_SECRET || 'secret', { expiresIn: '1h' });
};
/*Path of the file: project-root/src/controllers/userController.ts*/
import { Request, Response } from 'express';
import { findUserByUsername, generateToken } from '../services/userService';
export const loginUser = (req: Request, res: Response): void => {
const { username, password } = req.body;
if (!username || !password) {
res.status(400).json({ message: 'Username and password are required' });
return;
}
const user = findUserByUsername(username);
if (!user) {
res.status(401).json({ message: 'Invalid username or password' });
return;
}
if (user.password !== password) {
res.status(401).json({ message: 'Invalid username or password' });
return;
}
const token = generateToken(user);
res.json({ token });
};In the next step, you need to create an authentication middleware function. This function intercepts all the API calls made and validates whether they come from authenticated users or not. Create a directory middleware under src and add file authMiddleware.ts with the code below.
/*Path of the file: project-root/src/middleware/authMiddleware.ts*/
import { Request, Response, NextFunction } from 'express';
import jwt from 'jsonwebtoken';

export const authMiddleware = (req: Request, res: Response, next: NextFunction): void => {
  const token = req.header('Authorization')?.split(' ')[1];
  if (!token) {
    res.status(401).json({ message: 'Access Denied. No token provided.' });
    return;
  }

  try {
    jwt.verify(token, process.env.JWT_SECRET || 'secret');
    next();
  } catch (error) {
    res.status(400).json({ message: 'Invalid Token' });
  }
};
Now, it’s time to incorporate the authentication logic in each API call. Update the routes file to include the authMiddlware in each API call related to book management, as well as add a route related to login.
/*Path of the file: project-root/src/routes/index.ts*/
import { Router } from 'express';
import { getAllBooks, getBookById, addNewBook, removeBook } from '../controllers/bookController';
import { loginUser } from '../controllers/userController';
import { authMiddleware } from '../middleware/authMiddleware';

const router = Router();

router.post('/login', loginUser);

router.get('/books', authMiddleware, getAllBooks);
router.get('/books/:id', authMiddleware, getBookById);
router.post('/books', authMiddleware, addNewBook);
router.delete('/books/:id', authMiddleware, removeBook);

export default router;
In the final step, initialize the memory user database. Update server.ts file to make them look like the one below.
/*Path of the file: project-root/src/server.ts*/
import express from 'express';
import dotenv from 'dotenv';
import router from './routes';
import { initializeBooks } from './services/bookService';
import { initializeUsers } from './services/userService';

dotenv.config();

const app = express();
const PORT = process.env.PORT || 3000;

initializeBooks();
initializeUsers();

app.use(express.json()); // Middleware to parse JSON
app.use('/api', router);

app.listen(PORT, () => {
  console.log(`Server is running on http://localhost:${PORT}`);
});
Testing the APIs With Authentication
Calling APIs without providing the correct JWT token will now result in the below error from the server.
{
    "message": "Access Denied. No token provided."
}
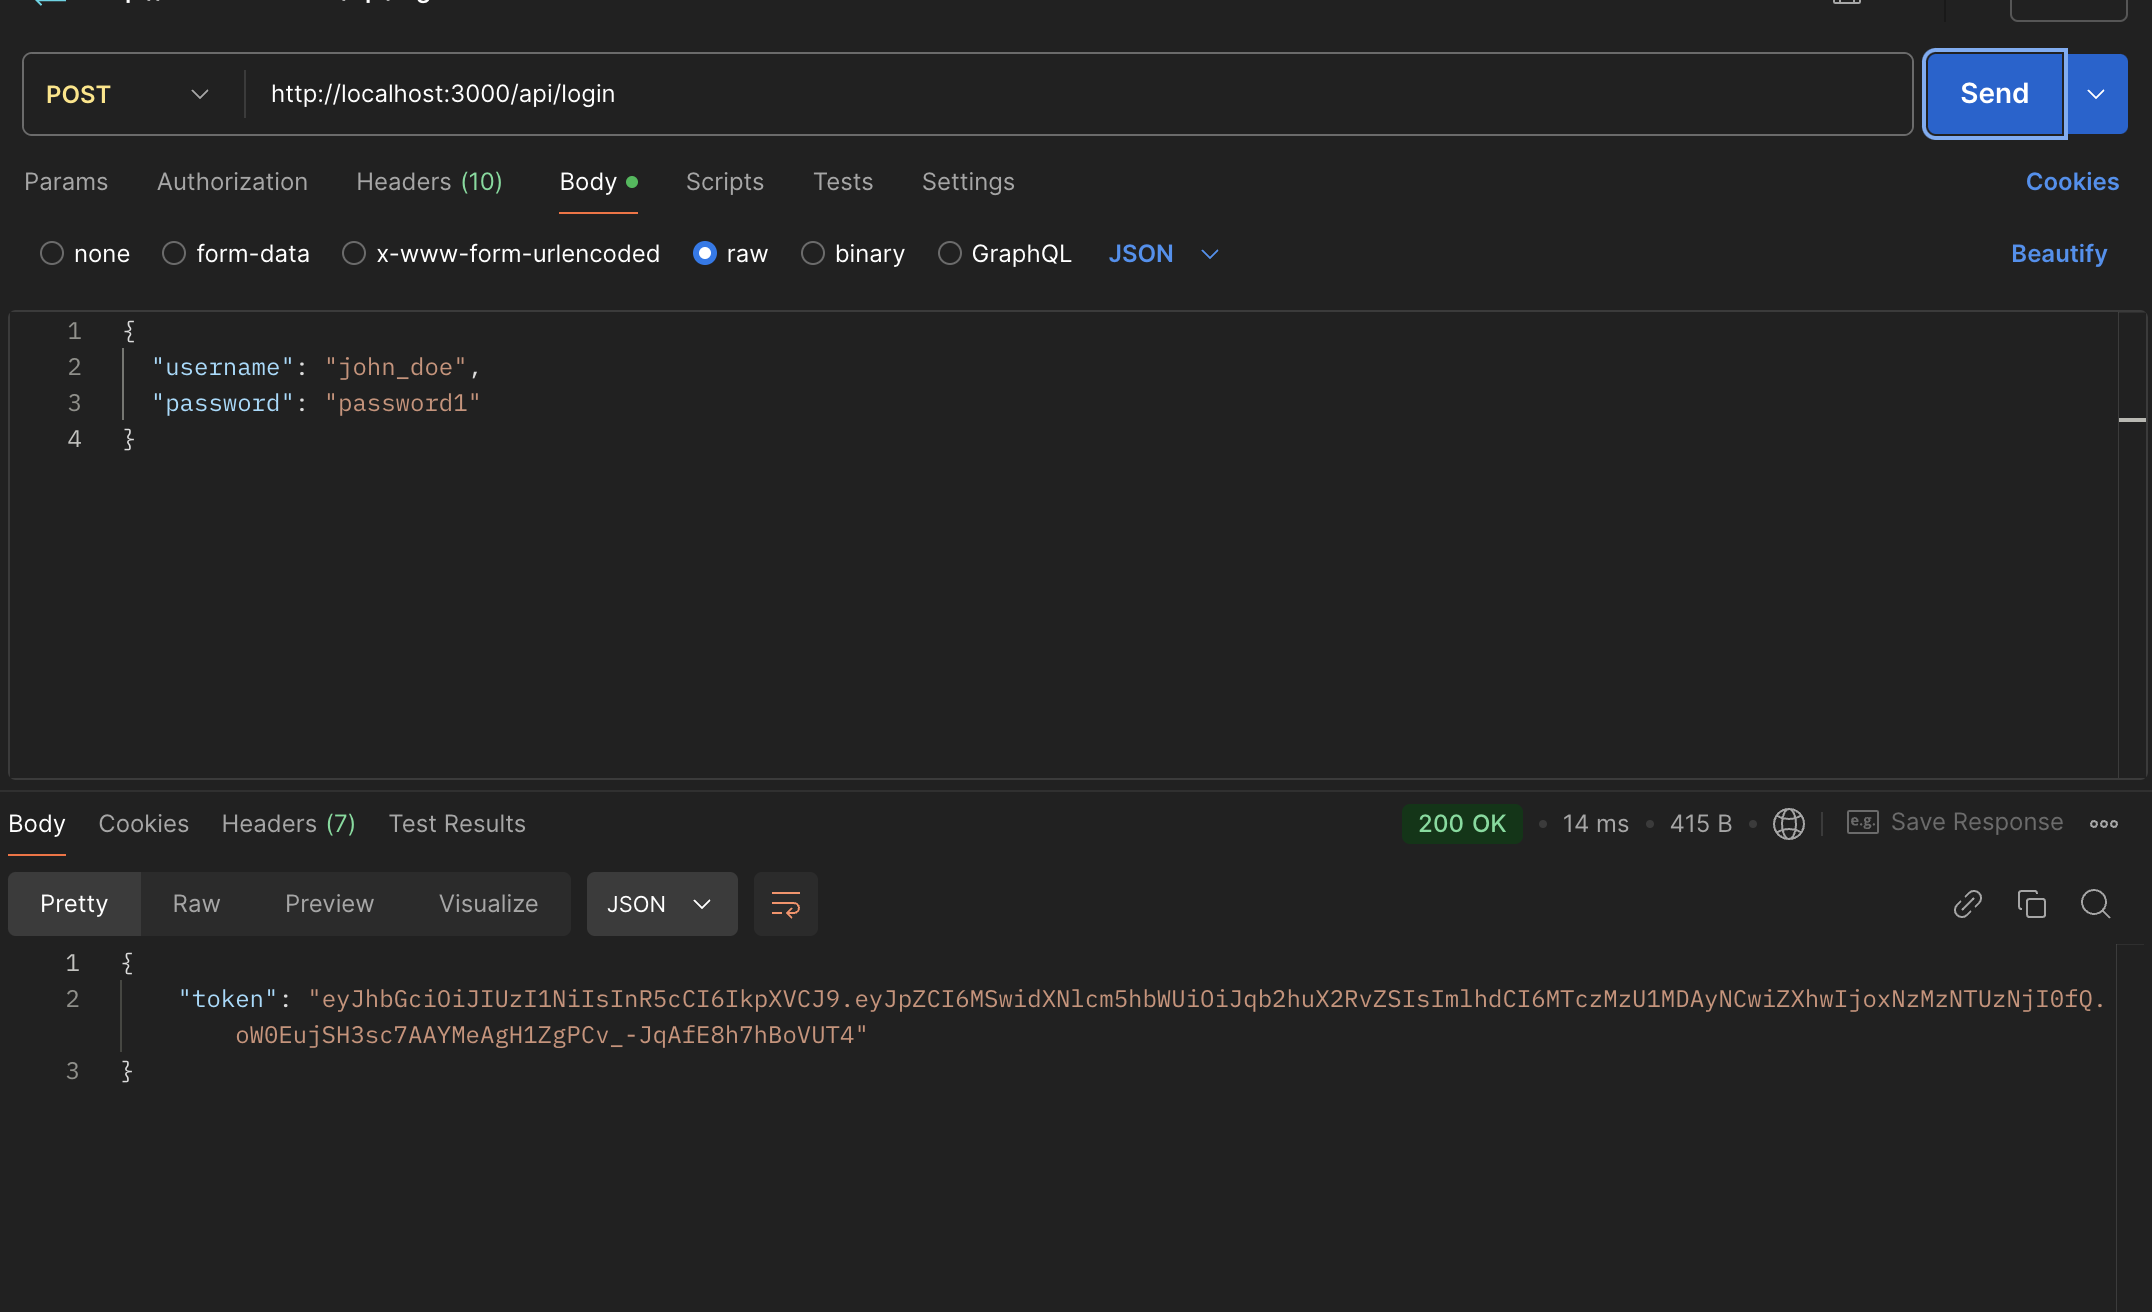
Before calling the APIs, you need to authenticate using the URL http://localhost:3000/api/login. Use this URL and provide your username and password. This will give you a valid JWT token, as illustrated below.

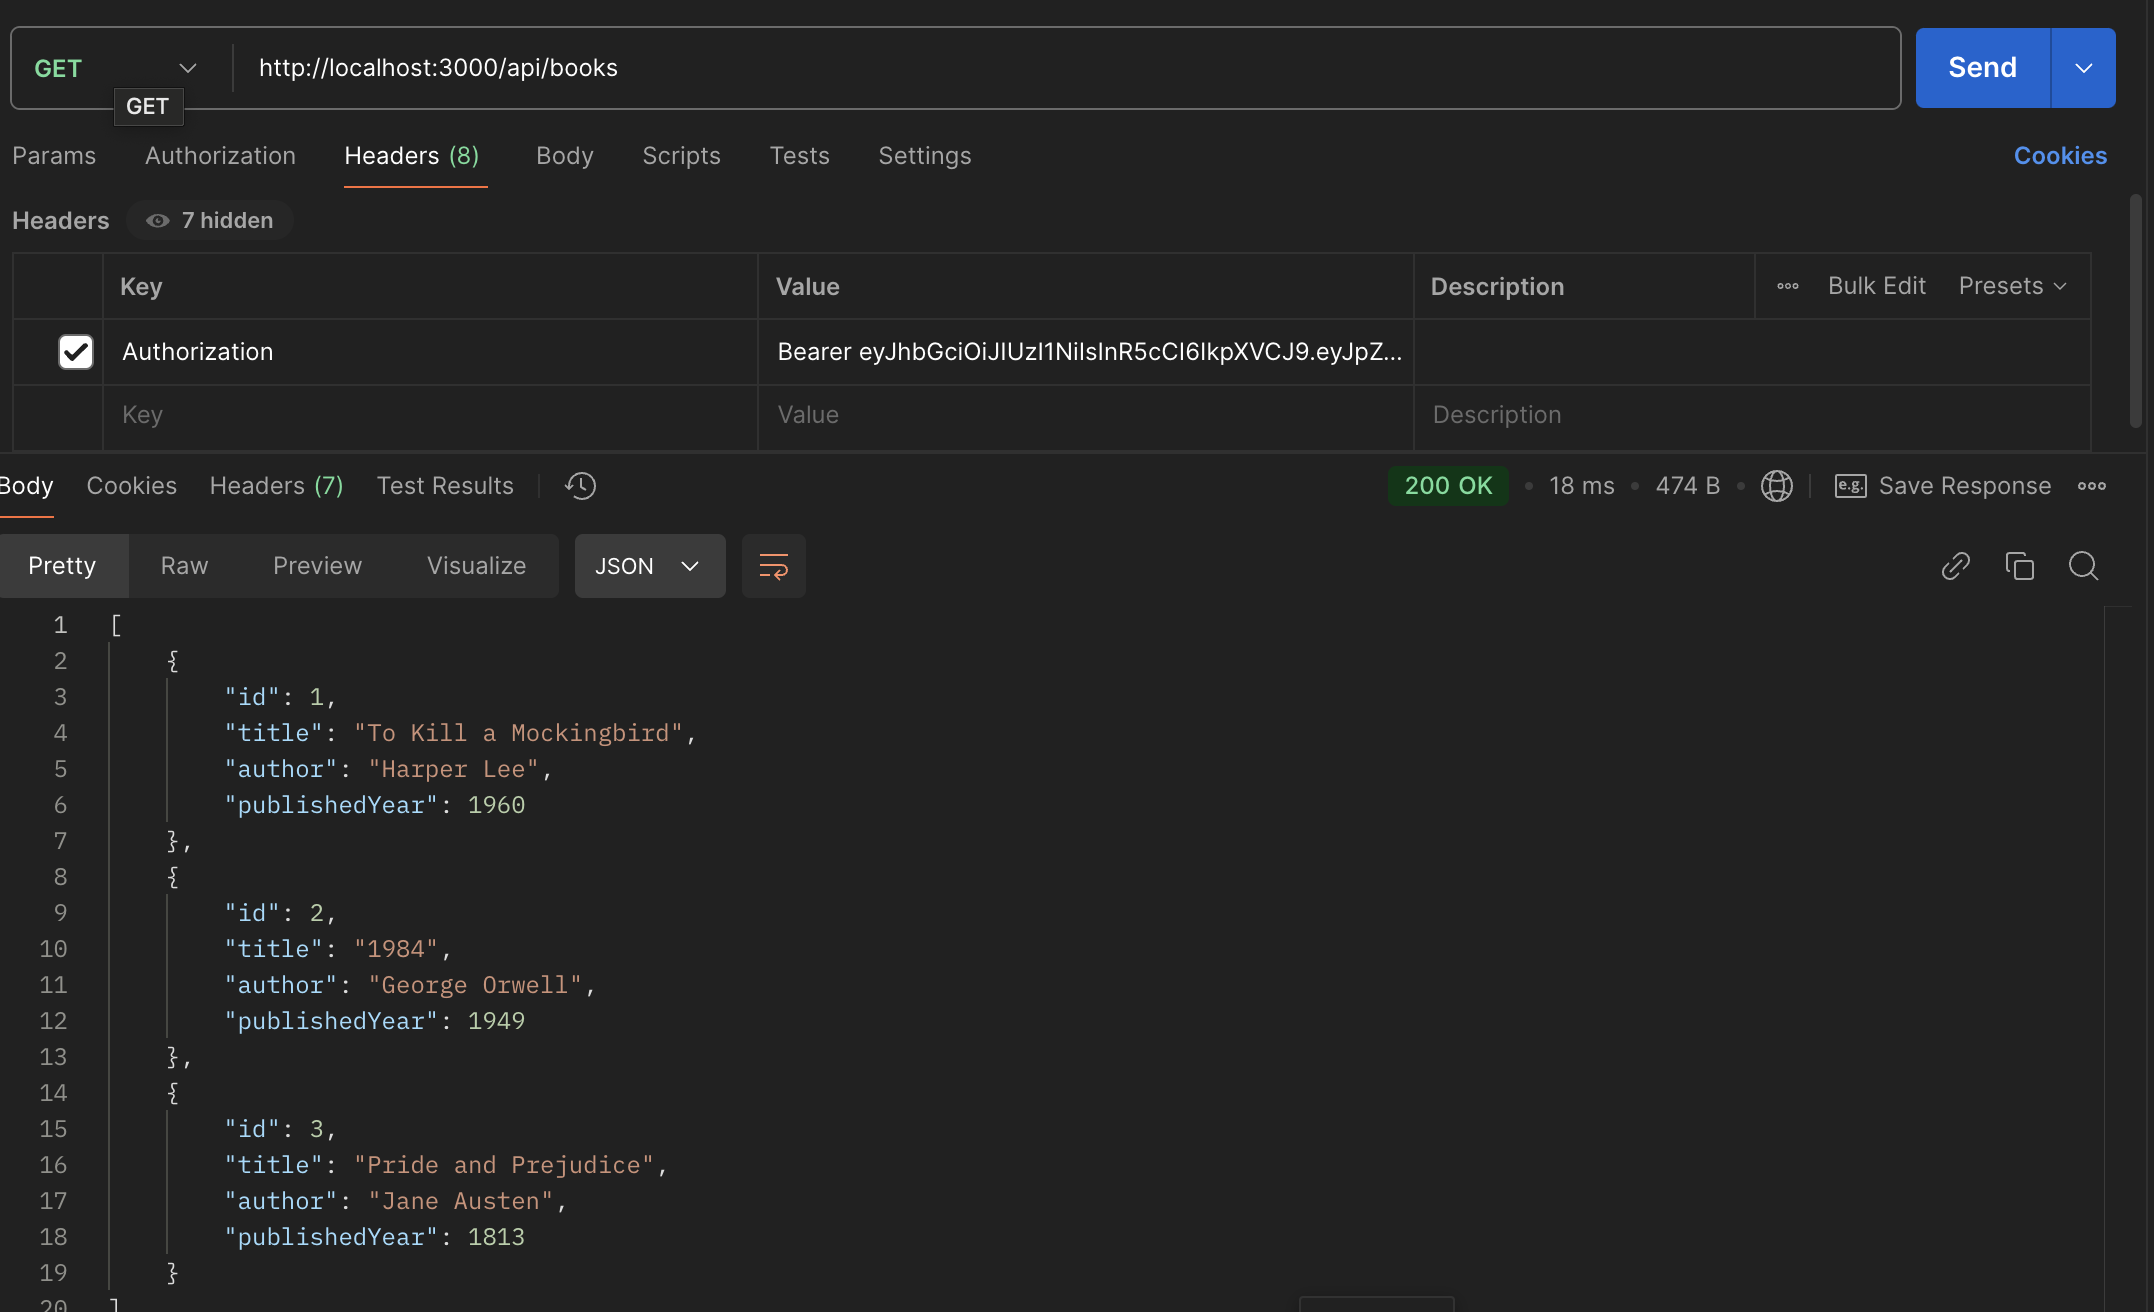
You should pass the received JWT to each API and preappend with the word bearer, as highlighted below. This will give you the correct response.

Conclusion
Securing your APIs is the most critical step in modern backend system design. So, congratulations on securing APIs with JWT. JWT makes authenticating APIs stateless and scalable. By leveraging JWT, your Node.js and Express APIs are now better equipped to handle real-world security challenges.


![The Lean Tech Manifesto With Fabrice Bernhard [Video]](https://devopsvault.io/wp-content/uploads/2024/12/The-Lean-Tech-Manifesto-With-Fabrice-Bernhard-Video-120x86.jpg)

