

The release of the DeepSeek open-source AI model has created a lot of excitement in the technology community. It allows developers to build applications entirely locally without needing to connect to online AI models such as Claude, ChatGPT, and more. Open-source models have opened doors to new opportunities when building enterprise applications that integrate with generative AI.
In this article, you will learn how to run such a model locally on your personal machine and build a full-stack React and NodeJS-powered application that is not just another chatbot. You will be able to use this application to analyze resumes faster and make smarter hiring decisions. Before you build the application, it is important to understand the benefits of open-source LLMs.
Benefits of Open-Source Large Language Models
Open-source models provide several key benefits over using proprietary models :
Cost-Effective and License-Free
Open-source LLMs are cost-effective and don’t need a special license. For example, as of the date of writing this, OpenAI’s o1 costs $60 per million output tokens, and open-source DeepSeek R1 costs $2.19.
Customizable and Fine-Tunable
Open-source models can be fine-tuned easily to meet unique business cases – allowing for more domain-specific use cases to be built. This leads to optimized performance in the enterprise applications.
Enhanced Data Security and Privacy
Open source makes applications more secure as precious personal data doesn’t need to be uploaded to third-party servers and stays on a local machine or a company’s network only stay in local machine or a companies network only. This provides a high level of data security. Furthermore, open-source models can be fine-tuned to remove any biases of data.
Community-Driven and No Vendor Lock-In
Open-source models enjoy large community support and benefit from the rapid pace of feature development. On the other hand, using property models makes the application vendor-locked and reliant on vendor companies to provide feature updates.
With this information in hand, you are ready to build a real-world application using the DeepSeek R1 open-source model, Node.JS, and React.
Project and Architecture Overview
You will be building a resume analyzer application — which will help you learn the benefits and shortcomings of the uploaded resume. DeepSeek R1 LLM will analyze the uploaded resume and provide feedback. You can learn about the architecture of the application through the illustration below.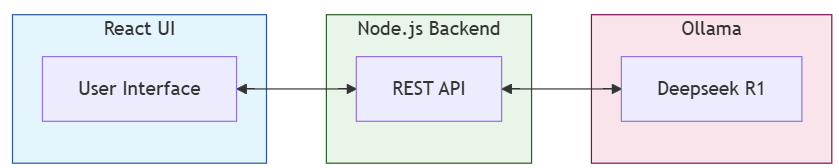
The React-based user interface communicates with the NodeJS-based backend using REST APIs. NodeJS backend then sends the user request to DeepSeek R1 hosted using Ollama. This entire tech stack can be run on a single machine, as you will do throughout the article, or it can be hosted across multiple containers in more complex use cases.
Prerequisites
- To run the project, you will need a machine with some compute power, preferably one that has an NVIDIA graphics card. The project has been developed and tested on
NVIDIA 4090RTXbased Windows machine and M2 MacBook Pro. - You will need to have NodeJS installed on the machine. This project has been built on NodeJS version 22.3.0. You can verify NodeJS installation using the
node -vcommand. - You will also need an editor of your choice to work through the code. Visual Studio Code has been used while building the application and is generally recommended.
Setting Up and Running DeepSeek Locally
To run DeepSeek R1 locally, follow the steps below:
1. Install Ollama from its official website.
2. After installation is complete, you will be able to run models using the ollama run command from your machine’s terminal.
3. Run the DeepSeek model of your choice. This tutorial was built using the DeepSeek R1 8-Billon parameter model. You can run it by using the command ollama run deepseek-r1:8b.
4. If you have a lower-specification machine than the one mentioned in the prerequisites section, the 7B and 1.5B parameter models will work as well, but the generated output quality may be lower.
5. It may take some time for models to run the first time as they will need to get downloaded. Once the model is running, you should be able to ask it a question right in the terminal and get an output. You can refer to the illustration below to view the DeepSeek R1 8B model in action.
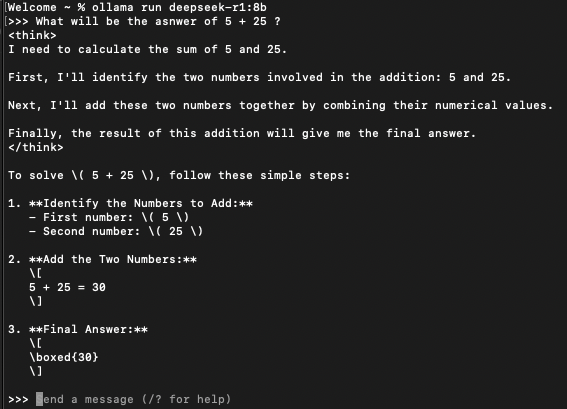
6. DeepSeek R1 is a reasoning model, and therefore, it thinks before giving the first answer it can generate. As highlighted in the illustration above, it is thinking before giving the answer to our prompt. This thinking can be seen in tags <think> </think>.
Cloning and Running NodeJS Backend
The Ollama service can be accessed via an API as well. You are going to leverage this API and build a NodeJS-based backend layer. This layer will take the uploaded PDF from the user and extract text from it. After the text extraction, the backend will feed the text to the DeepSeek R1 model via the Ollama API and get a response back. This response will be sent to the client to display to the user.
1. Clone the backend project from GitHub using this URL. Ideally, you should fork the project and then clone your own local copy.
2. After cloning, to run the project, go to the project root directory using cd deepseek-ollama-backend.
3. Once inside the project root, install dependencies by giving npm install command. Once the installation completes, the project can be run using the npm start command. The core of the project is the app.js file. Examine its code, which is provided below.
const express = require('express');
const multer = require('multer');
const pdfParse = require('pdf-parse');
const axios = require('axios');
const fs = require('fs');
const cors = require('cors');

const app = express();
app.use(cors());
app.use(express.json());

const upload = multer({
    dest: 'uploads/',
    fileFilter: (req, file, cb) => {
        file.mimetype === 'application/pdf' ? cb(null, true) : cb(new Error('Only PDF files are allowed!'));
    }
}).single('pdfFile');

app.post('/analyze-pdf', (req, res) => {
    upload(req, res, async function(err) {
        if (err) {
            return res.status(400).json({ error: 'Upload error', details: err.message });
        }
        try {
            if (!req.file) {
                return res.status(400).json({ error: 'No PDF file uploaded' });
            }

            const dataBuffer = fs.readFileSync(req.file.path);
            const data = await pdfParse(dataBuffer);
            const pdfText = data.text;
            fs.unlinkSync(req.file.path);

            const response = await axios.post('http://127.0.0.1:11434/api/generate', {
                model: "deepseek-r1:8b",
                prompt: `Analyze this resume. Resume text is between two --- given ahead: ---${pdfText}---`,
                stream: false
            });

            res.json({ success: true, message: 'Successfully connected to Ollama', ollamaResponse: response.data });
        } catch (error) {
            if (req.file && fs.existsSync(req.file.path)) {
                fs.unlinkSync(req.file.path);
            }
            res.status(500).json({ error: 'Error processing PDF', details: error.message });
        }
    });
});

if (!fs.existsSync('uploads')) {
    fs.mkdirSync('uploads');
}

const PORT = process.env.PORT || 3000;
app.listen(PORT, () => {
    console.log(`Server is running on port ${PORT}`);
});
4. The client interacts with the backend by invoking /analyze-pdf API endpoint, which is of type POST. The client sends the user-uploaded pdf file as a payload to this API.
5. The server stores this file in uploads directory temporarily, and extracts the text in the file.
6. The server then prompts DeepSeek R1 using Ollama’s localhost API endpoint.
7. DeepSeek R1 analyzes the content of the resume and provides its feedback. The server then responds to the client with this analysis using res.json().
Cloning and Running the React User Interface
The user interface of the project will allow users to upload the resume, send this resume to the backend and then display the result of DeepSeek R1’s analysis of the resume to the user. It will also display an internal chain of thoughts or thinking of DeepSeek R1 as well.
1. To get started, fork and then clone the project from this GitHub URL. You can simply clone it as well if you don’t intend to do many customizations.
2. Once the project is cloned, go to the root project directory using the command cd deepseek-ollama-frontend.
3. Inside the project root, install the necessary dependencies using the npm install command. After the installation completes, start the project using the npm run dev command.
4. The main component of this React application is ResumeAnalyzer. Open it in your editor of choice and analyze it.
import './ResumeAnalyzer.css';
import React, { useState } from 'react';
import { Upload, Loader2 } from 'lucide-react';
import AnalysisSection from './AnalysisSection';

const ResumeAnalyzer = () => {
  const [file, setFile] = useState(null);
  const [loading, setLoading] = useState(false);
  const [feedback, setFeedback] = useState(null);
  const [error, setError] = useState(null);

  const handleFileChange = (event) => {
    const selectedFile = event.target.files?.[0];
    if (selectedFile && selectedFile.type === 'application/pdf') {
      setFile(selectedFile);
      setError(null);
    } else {
      setError('Please upload a PDF file');
      setFile(null);
    }
  };

  const analyzePDF = async () => {
    if (!file) return;

    setLoading(true);
    setError(null);

    try {
      const formData = new FormData();
      formData.append('pdfFile', file);

      const response = await fetch('http://localhost:3000/analyze-pdf', {
        method: 'POST',
        body: formData,
      });

      if (!response.ok) {
        const errorData = await response.json();
        throw new Error(errorData.details || 'Failed to analyze PDF');
      }

      const data = await response.json();
      setFeedback(data);
    } catch (err) {
      setError(err.message || 'An error occurred');
    } finally {
      setLoading(false);
    }
  };

  return (
    <div className="max-w-4xl mx-auto p-4">
      <div className="bg-gray-50 rounded-lg shadow-lg p-6">
        <h1 className="text-3xl font-bold mb-6 text-gray-800">Resume Analyzer</h1>

        <div className="bg-white rounded-lg shadow-sm p-8">
          <div className="border-2 border-dashed border-gray-300 rounded-lg p-8 text-center">
            <Upload className="w-12 h-12 text-gray-400 mx-auto mb-4" />
            <input
              type="file"
              accept=".pdf"
              onChange={handleFileChange}
              className="hidden"
              id="file-upload"
            />
            <label
              htmlFor="file-upload"
              className="cursor-pointer text-blue-600 hover:text-blue-800 font-medium"
            >
              Upload Resume (PDF)
            </label>
            {file && (
              <p className="mt-2 text-sm text-gray-600">
                Selected: {file.name}
              </p>
            )}
          </div>
        </div>

        {error && (
          <div className="mt-4 p-4 bg-red-50 text-red-700 rounded-lg border border-red-200">
            {error}
          </div>
        )}

        <button
          onClick={analyzePDF}
          disabled={!file || loading}
          className="mt-6 w-full bg-blue-600 text-white py-3 px-4 rounded-lg hover:bg-blue-700 disabled:opacity-50 disabled:cursor-not-allowed flex items-center justify-center font-medium transition-colors"
        >
          {loading ? (
            <>
              <Loader2 className="mr-2 h-5 w-5 animate-spin" />
              Analyzing Resume...
            </>
          ) : (
            'Analyze Resume'
          )}
        </button>

        {feedback && !loading && (
          <div className="mt-8">
            <h2 className="text-2xl font-bold mb-6 text-gray-800">Analysis Results</h2>
            {feedback.ollamaResponse &&
              <AnalysisSection ollamaResponse={feedback.ollamaResponse} />
            }
          </div>
        )}
      </div>
    </div>
  );
};

export default ResumeAnalyzer;
5. This component provides an input field for the user to upload the file.
6. The uploaded file is sent to the server using the API endpoint.
7. The response of the server is divided into two parts- Internal thinking of the model and actual response of the model.
8. The AnalysisSection component displays the response of the model as well as houses the ExpandableSection component, which is used for displaying DeepSeek R1’s internal thinking.
9. Navigate to the URL in your browser to load the application. Upload your resume (or any sample resume) and observe the analysis received by DeepSeek R1.
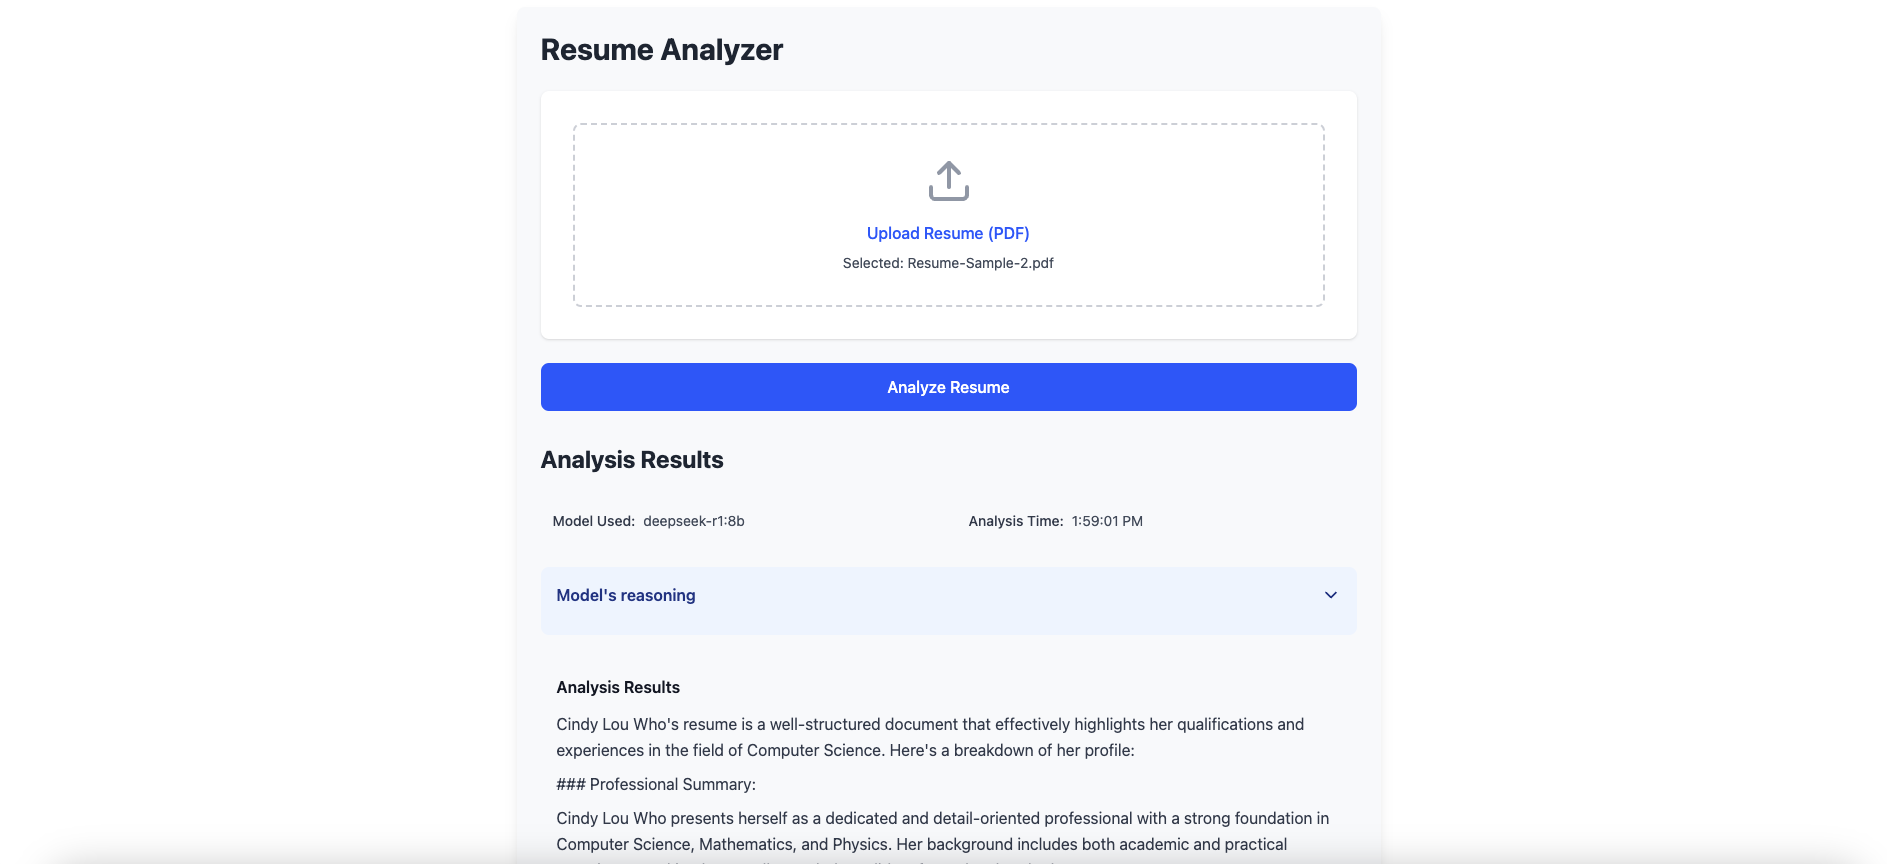
Resume Analyzer
Conclusion
DeepSeek R1 provides a unique opportunity to build GenAI-powered applications completely in-house, and customize them as per your needs.
In this article, you have learned about the benefits of using open-source GenAI models. Furthermore, you have set up a real application using DeepSeek R1, Node.js, and React. This setup allows you to perform resume analysis using AI completely offline. You can use this tool to hire smart at your organization, and I advise you to continue building on the knowledge gained from this article and explore more use cases and applications.


